Abstract
This article provides an in-depth exploration and examination of operations against and around Post 11 as part of the Australian assault on Bardia. Despite the interesting nature of such operations in their own right, it aims at more than simply recounting details of this remarkable action. Events in and around Post 11 some 67 years ago provide a number of salutary lessons for modern commanders. In particular, the destructive effects of inflated ego and personal pride, stubbornness in the face of commonsense, command negligence and tactical incompetence are brought to the fore. These types of problems are as timeless as they are dangerous. Post 11 is what happens when they reign unchecked.
On the morning of 3 January 1941, the first significant land battle of the Second World War planned and fought by an Australian formation began. With the first rays of dawn the soldiers of Major General Iven Mackay’s 6 Division attacked the Italian colonial fortress town of Bardia, a small harbour on the Mediterranean coast of what was, at that time, Italy’s Libyan colony. Situated a short distance west of the Egyptian border in the province of Cyrenaica, it had been developed between the wars as a military outpost and was fortified with a string of concrete defensive posts, almost 30 kilometres long, built in an arc around the town. Although Bardia, throughout the 1930s, had been a sleepy village with a quiet garrison, Mussolini’s declaration of war against Britain in June 1940 dramatically increased its strategic significance and sealed its fate. The fortress was initially used as a staging area for a rather unspectacular Italian invasion of Egypt in September 1940. Two months later, following a strikingly successful British counter-offensive, Bardia found itself on the front line as an obstacle to the continuing British thrust into Libya. In the last weeks of 1940 it was besieged. At this point the Australians, having begun to arrive in the Middle-East in February 1940, were called to put into effect what they had been so busy practising.
Following a successful break-in by 16 Brigade on the western face of the Italian perimeter on the first morning of the attack, after close to 55 hours of fighting, the last Italian defenders laid down their arms. The victory cost 6 Division 129 men killed and 329 wounded. Italian casualties totalled close to 1000 dead, 3000 injured and a further 36,000 taken prisoner, including the five divisional commanders. In numerical terms alone, leaving aside the vast quantities of military stores and equipment captured by the attackers within the Bardia perimeter, the battle was a monumental Australian success.
As the opening artillery barrage for the main 6 Division assault against the western face of the Bardia perimeter erupted, Lieutenant Colonel A H L Godfrey launched the Victorians of 2/6 Battalion against the line of posts on the southern face of the Italian line at Wadi el Muatered. He had been ordered to create a diversion to distract Italian attention from the main point of break-in, 11 kilometres to the north-west, but did nothing of the sort. Instead of a feint attack, Godfrey mounted a full-scale assault to seize and occupy the posts on northern bank of Wadi el Muatered. In doing so, he sentenced many of his men to death for no good operational purpose. Once the assault began, Godfrey’s men and the Italians opposing them fought some of the hardest and most costly actions of the entire battle. The centre of gravity for both sides became the struggle for Post 11 on the extreme left of the 2/2 Battalion attack—an epic which has passed into Anzac legend. Ivor Hele’s famous oil painting of the action hangs to this day in the Australian War Memorial. However, for all Hele’s imagery of savage combat and horrible aftermath, this engagement, like the rest of Godfrey’s attack, should never have unfolded as it did.
From the time 2/6 Battalion deployed opposite the Italian perimeter in late December, an intensive patrolling program made Godfrey well aware of two important facts. First, the terrain to his front was difficult and dominated by Wadi el Muatered, around 90 metres wide and between 110–140 metres deep, with precipitous sides, running across the entire front of 2/6 Battalion’s position. Certainly, there were covered approaches from the south available to Godfrey’s men in the form of two tributary wadis. Brigadier Savige, 17 Brigade’s commander and Godfrey’s immediate superior, christened the eastern most of these ‘Rowan Wadi’, after Captain J G Rowan, who commanded C Company stationed closest to this branch. Further west was ‘Little Wadi’, named after Captain M C D Little, who led D Company positioned in this area. At the same time these tributaries offered no easy way to overcome the natural obstacle of Wadi el Muatered, even if it could be entered. The ‘mouths’ of Rowan and Little Wadis were well covered out to a distance of almost 400 metres by Posts 7 and 11 respectively, sited on the northern banks of the wadi.1
The second key aspect of Godfrey’s position was the obvious strength of the Italian line facing him. In addition to the known concentration of artillery in the area, local Italian commanders had worked hard to develop the natural advantages of their position. There was no doubt that the defensive line on north bank of Wadi el Muatered was superior to any other point on the Bardia perimeter. The posts in the area were generally larger and more formidable than those elsewhere. Due to the nature of the broken terrain they were also closer together, enabling mutual support, and the Italians had built sangars and machine-gun posts in between to cover any sheltered approaches. Post 11 was particularly strong. It was sited opposite Godfrey’s extreme left flank, and stood where Wadi el Muatered made a wide arc, which provided the defenders with an excellent field of vision and fire. In addition, in the bed of the Wadi el Muatered the Italians had built rows of double apron wire, around three metres wide, to entangle and expose an attacker to fire from the northern bank. All ground south of the Italian line—with the exception of Wadi el Muatered’s northern lip and the tributary wadis noted—could be swept by fire out to around 1000 metres. A successful attack on any Italian post in this vicinity would require an advance over open ground, or else advance using the tributary wadis deliberately covered by Italian posts. On reaching Wadi el Muatered, an attacker would have to climb down the steep southern bank, pausing in an exposed position to cut the wire, then climb up the northern side, deal with any sangar complexes discovered, and finally attack the posts themselves. All of this would have to be done under pre-registered and well sited Italian indirect and small arms fire.2
In the days leading up to 3 January, Godfrey’s men had essentially succeeded in carrying out the pre-attack divisional deception plan of attracting Italian attention south to prevent it wandering in the direction of the true break-in point further northwest. In the last days of December, patrol and intelligence reports noted a substantial increase in Italian activity opposite 2/6 Battalion. The posts along Wadi el Muatered were being packed with men and weapons, just as the divisional planning staff had hoped. Captured Italian documents confirmed up to eight full regiments had been drawn to the southern perimeter to face the expected Australian attack. The Italians had long planned their defence with an attack from the south in mind, and were actively preparing to receive it. This was as clear to Godfrey as it was to Brigadier Savige and Major General Mackay. It was, after all, a key reason why Colonel Frank Berryman, the senior division operations officer, had advocated a main divisional attack from the west and not the south. Experience had also shown that the Italian troops in the vicinity of Wadi el Muatered, drawn predominantly from 63 Cyrene Division, were far more aggressive and alert than those encountered further north-west.3 Their reactions to Australian probing in the area were vigorous, and at the same time displayed a high level of fire discipline. The night before the scheduled ‘demonstration’, patrol reports from 2/6 Battalion concluded that the ‘enemy is now very much on the alert and appear to be now conserving ammunition for the expected attack’.4
It would seem logical then, all things considered, that actually mounting an attack against the Italian line at Wadi el Muatered might not be the wisest course of action. What would be the point? The effort to deceive the Italians as to the true location of the break-in had already succeeded. Certainly a demonstration, like that actually ordered, might insure against the unlikely eventuality of Italian concentrations in the vicinity moving north-west. Moreover, such a diversion, perhaps by fire only, might accomplish this without undue risk. For all the associated danger of assaulting a well prepared enemy position, exactly where it was expected, and at its strongest point, a full-scale attack could achieve no more. Physical possession of the posts was meaningless. If the main divisional attack succeeded, they would quickly become isolated, vulnerable to the rear, and essentially untenable. The posts along the Wadi el Muatered could not hold out while the rest of the Bardia defensive system crumbled. Against explicit orders, however, an all-out assault is exactly what Godfrey launched. The question is why?
Godfrey’s decision to attack rather than demonstrate against the Italian posts on the northern bank of Wadi el Muatered, in clear contradiction to the instructions he had received, was not simply a case of disobeying orders. The complex trail of decision-making that led to this point began in the confusion created by inconsistencies between Brigadier Savige’s brigade orders to Godfrey on 1 January—based on agreements reached at a series of divisional conferences—and a written divisional order received by 17 Brigade late that night. It is clear that in his original orders Savige directed 2/6 Battalion to capture the Italian posts along the Wadi el Muatered. Godfrey was to ‘occupy’ the area ‘from Post 5 to Post 11’.5 When Savige received written divisional orders, however, he was surprised to read 2/6 Battalion was now to stage only a ‘demonstration’ against the south-western corner of the southern sector.
In challenging Mackay’s written orders, Savige complained that 2/6 Battalion would at the very least need to occupy the northern bank of Wadi el Muatered shortly after H-hour for the main divisional attack. In his reply, Mackay amended his instructions but not the fact that Godfrey’s men were still to stage a demonstration only. However, Mackay now added the caveat that if (and only if) a favourable situation arose, Savige might use his discretion to occupy Italian Posts 5-11. This was not to be done from the outset, but only as favourable circumstances permitted. Savige re-issued instructions to Godfrey to amend his battalion plan along these lines with clear orders to ‘demonstrate by fire’.6 However, Godfrey ignored the alteration and chose to go ahead with his original plan, directing his men to ‘capture enemy positions on Wadi el Muatered from Post 3 to Post 11’.7 He told Captain Little: ‘I will see you then in Post 11 tomorrow morning, or I shall not see you at all’.8 Such orders were a direct and unequivocal contradiction of both divisional and brigade instructions. As it turned out, in the case of Post 11, Godfrey pressed his attack for three days, much more than a demonstration and certainly not a reaction to any ‘favourable situation’.
Godfrey’s actions have baffled authors for more than 60 years. In 1947, Gavin Long, Australia’s official historian of the Second World War, wrote to a number of officers present to see if they could shed some light on the issue. Long never received a credible explanation. Within this vacuum he took an uncritical approach and gave the first of a number of well-worn excuses in that Godfrey did not have time to change the orders he originally issued after receiving Savige’s amendments. This is nonsense. Savige issued his amended orders at 9.30 am on 2 January, giving Godfrey 20 hours to react. Savige himself managed to rewrite and reissue new brigade orders three hours after receiving Mackay’s amendments. Godfrey had plenty of time to change his plan. He chose not to. Godfrey confirmed his orders at 7.00 pm on 2 January, directing an attack.9
Many historians have also justified Godfrey’s decision by claiming that a lack of clear instructions caused him to misinterpret Savige’s orders, thinking that they somehow implied the need to capture Post 11 and the other Italian positions on the northern lip of Wadi el Muatered. Again this is nonsense. Godfrey himself undermined this argument after the battle in praising the ‘clear orders and instructions received from the Brigadier’.10 Any lack of clarity was removed by Mackay’s orders of 2 January. Savige’s amendments of the same day were unequivocal. So were Godfrey’s own orders to his men, written in his own hand. There is no basis to support the contention that the higher plan had not been made sufficiently clear. A slight spin on the ‘confusion’ argument is that there was some ambiguity about what a ‘demonstration’ might actually mean. How far should it be pressed? The answer to such questions must vary as circumstances dictate, but clearly, regardless of terrain or tactical disposition, a demonstration is not an assault aimed at capturing and holding an enemy position.
The final justification used by various authors to soften criticism of Godfrey is the idea that tactical necessity demanded the occupation of the Italian posts on the northern bank of Wadi el Muatered. This was the angle pursued by both Godfrey and Savige after the fact. The argument is that only the north bank of the wadi provided sufficient cover from shellfire once the ‘demonstration’ began. Being on the north bank would itself necessitate the capture of nearby posts. This logic is circular and flawed. The battalion had already shown itself capable of mounting fighting patrols under shellfire without taking casualties, and the companies themselves were dug into sheltered positions. A demonstration using fighting patrols, and certainly one ‘by fire’, would have borne no unacceptable degree of risk. It would have been much less dangerous than the assault actually mounted. Godfrey’s insistence about the need to capture the posts ‘at the earliest’ makes sense only if it is based on an assumption that no demonstration could occur without occupation. This was obviously untrue, even to Godfrey.11
If traditional excuses fail to explain Godfrey’s actions, what then were the true reasons for disobeying orders at such a hefty price? The first part of the answer lies with Godfrey’s character and leadership style. As patrolling operations in front of Wadi el Muatered in late December proved, he was an aggressive commander. He was often to be found further forward than was prudent, and he was killed in November 1941 leading a brigade at El Alamein.12 Savige called him ‘a bold fighter’, ‘inclined to be impulsive’.13 In Godfrey’s first battle of the war, Savige later reflected, ‘he would, I think, resent the enemy holding up his advance with the likelihood that his soldierly pride might force him into retaliatory action which otherwise he might not contemplate’.14 If it was soldierly pride that tipped Godfrey’s hand then this is a severe indictment. Further evidence points in a similar direction. On the eve of battle, Godfrey stressed to his men that this was their first great test. He wanted, in no uncertain terms, to teach the Italians a lesson. His attitude was that, ‘whenever the AIF went into the lines in the last war the Germans knew that, whatever the outcome, they were going to get hurt’.15 ‘We shall give these birds,’ claimed Godfrey, ‘to understand the same.’16 He was quite determined to ‘give the enemy such a thrashing that they will never stand up to an assault by Australian infantry again’.17 A simple demonstration would never do. Godfrey always intended to attack. However, an untempered aggressive streak, a desire to make his name, or a romantic determination to outshine his Anzac forebears, does not justify unnecessary loss of life.18
Despite the circumstantial evidence, Godfrey does not bear the responsibility for 2/6 Battalion’s needless assault alone. Brigadier Savige must share the blame. In the final equation it was Savige’s tacit agreement with Godfrey’s plan that encouraged and facilitated the attack. Despite the letter of the orders he passed down from Mackay on 2 January, the spirit of Savige’s intent was something else entirely. His written orders to 2/6 Battalion belied a commonality of purpose and intent shared with Godfrey. The attack was forbidden by Savige, with ‘a wink and a nudge’. There was an implied understanding between the two that this ‘demonstration’ would be much more.
Savige and Godfrey were old friends from their days in the Victorian militia and had a close personal relationship. Savige was also intensely interested in Godfrey’s area of operations and visited 2/6 Battalion once or more each day in the lead up to the assault. Before receiving written divisional orders Savige believed, like Godfrey, that the Wadi el Muatered posts ought to be taken, and the two men had already worked out the essential elements of this plan. In his protestations to Mackay late on 1 January, Savige showed his hand. Not only did he contend that 2/6 Battalion should ‘at least be on the north face of the wadi when the battle opens’, but that such a recommendation was based on ‘carefully laid plans and actions so thoroughly carried out by the CO and troops of 2/6 Bn’.19 During the final divisional coordinating conference in the afternoon before the battle, Savige talked of the armoured support required to ‘assist the forward company of 2/6 to get through the perimeter’.20 He was clearly thinking of much more than a demonstration. Savige and Godfrey were of the same mind. Godfrey wanted to attack and Savige wanted to let him. Contrary orders, especially those originating from Colonel Berryman, a regular officer and no friend of Savige’s, were not going to change their minds, despite the fact that Savige was now forced to be seen to comply with Mackay’s directives. The situation was well summed up by Sergeant H (Jo) Gullett, commanding 17 Platoon, D Company, 2/6 Battalion, who was there at the time. Gullett wrote that Savige and Godfrey ‘looked at each other and they agreed. Someone needed to make a decision and they did not baulk at it.
A feint attack would not do.’21 While impossible to prove, it seems clear that there was a covert understanding between Savige and Godfrey. Despite written divisional orders, passed on by Savige, both men understood that 2/6 Battalion would attack.22
Further evidence of a behind-the-scenes understanding between Godfrey and Savige surfaced after the battle. Godfrey wrote that ‘[Savige] agreed with my deductions, and I feel had this advice not been acted on, and a feint attack only been made [as Savige in fact ordered], the casualties in my Battalion would have been enormous’.23 Furthermore, Savige never once criticised Godfrey for what appeared to be direct disobedience of his orders. To the contrary, during the battle he wrote to Godfrey noting that ‘all I can say about 2/6 and its work today is “Gallant Gentlemen” ’, hardly the sentiments of a brigade commander whose instructions had been ignored.24 In his after-action report Savige praised Godfrey’s overall conduct as ‘magnificent’.25 After Bardia, Godfrey was not court- martialled as might be expected. Rather he was decorated and subsequently promoted on Savige’s recommendation, and with Savige’s support.26 Such inflated praise and continuing support for Godfrey masked, perhaps, a measure of personal culpability. After the war Savige reflected on both his relationship with Godfrey and his own responsibility in encouraging the attack at Wadi el Muatered, noting that his subordinate
would not deliberately disobey my orders ... we had a mutual faith and trust in each other ... If there were errors in the fight on my southern sector by Godfrey I am bound to accept full measure of blame. I knew ... the possible need to capture those posts ... I concurred with this and think I recommended this course of action, in this situation, in our discussions. 27
Godfrey’s attack on Wadi el Muatered disobeyed Mackay’s instructions and the paper orders issued by Savige. At the same time it was perfectly aligned with his brigade commander’s intent. Both Godfrey and Savige share the blame for an attack that should never have been launched and the responsibility for the men who died needlessly as a result.
Putting aside the tangled path that led to the decision, orders were passed for 2/6 Battalion to attack and it is time to examine exactly how Godfrey planned to execute such an ambitious gamble. The attack was planned in two phases. The first, under the cover of darkness on the morning of 3 January, involved an infiltration by three assault companies to positions within 350 metres of the southern bank of the Wadi el Muatered, from which they were to launch three essentially independent company attacks. On the left Captain Little’s D Company, and in the centre Captain Rowan’s C Company, were both to creep forward using the cover of Wadi Little and Wadi Rowan. To their right, B Company, led by Captain W T Muhlhan, had no such cover and were to move over open ground. Meanwhile, Godfrey’s headquarters and a reserve company were to close up to their rear. All phase one moves were to be completed by 5:15 am. After a short pause, followed by two five-minute artillery concentrations on Posts 7-13, at 5:45 am phase two was scheduled to begin. At this moment all three assaulting companies were to launch themselves at their objectives. Little’s men were to capture Post 11 and a road junction immediately to its west, while Rowan’s company was to take Posts 7 and 9. Captain Muhlhan was to support Rowan’s attack by an advance against Post 5 and, if possible, to extend the line east to Post 3.28
Nervous energy made it unnecessary to wake most of Godfrey’s men in the pre-dawn darkness before the attack. After a quick, cold breakfast soldiers filed past their quartermasters for extra ammunition while company commanders shook hands and issued final tots of rum. Still under the cover of night, the shivering men of 2/6 Battalion moved to their assembly areas. The going was tough over broken, rough and rocky ground, but the forward elements of the battalion successfully moved into Rowan and Little Wadis, and pushed on close to their junction with Wadi el Muatered. Once in position, the men crouched and waited. In D Company, Captain R Kiddle, Little’s second-in-command, visited his platoon commanders to discuss the coming attack over a whiskey flask. At exactly 5:45 am, as the dawn broke, the battalion attack began. Immediately, in response to the short Australian preparatory barrage, the full weight of Italian artillery concentrated in the southern Mereiga Sector was brought to bear. An ever increasing storm of shrapnel greeted the Australians as they emerged from their covered positions, and three close company-level battles erupted along the northern bank of Wadi el Muatered.29
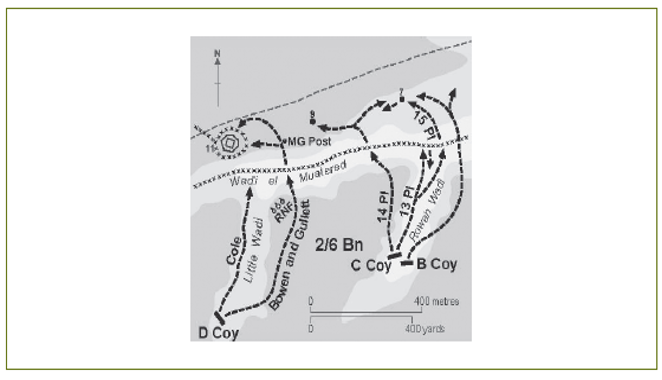
The plan for 2/6 Battalion’s ‘demonstration’, which was in reality a full-scale assault on the Italian line at Wadi el Muatered on the morning of 3 January.
After a desperate scramble in the centre of the battalion attack, Captain Rowan’s C Company managed to cross the Wadi el Muatered and carve out a tenuous salient, a mere 250 metres wide by 90 metres deep, on the far bank. During a brief lull in the Italian fire, one of Rowan’s forward platoons managed to close on and then capture Post 9.30 After watching a second platoon attack further to the right against Post 7 falter, three private soldiers from the vicinity of Post 9 took the initiative. They moved along the north bank of Wadi el Muatered and proceeded to make their own small-scale flanking assault. Under covering Bren gun fire the three advanced along the edge of Post 7, throwing grenades into open slits until it surrendered. This remarkable action enabled C Company to occupy Post 7. Testament to the uncommon determination of the defenders in this area, the Australians faced an immediate counterattack, but successfully repulsed it.31
To the right of Rowan’s attacks, Captain Muhlhan’s B Company met early trouble. Once across the wadi, Muhlhan’s men quickly occupied a 350-metre stretch of the northern bank but, under concerted Italian counterattack for more than an hour, were unable to advance further towards their objectives at Posts 5 and 3. As B Company held its tenuous position under fire from machine-guns on its right flank, another counterattack against Post 9 forced Captain Rowan to reinforce it with men from Post 7. Muhlhan’s company subsequently took over the post, grateful for the cover it provided. By 8:00 am, the situation in the centre and on the right flank of the 2/6 Battalion attack was grim. After a difficult advance, C and B Companies held Posts 9 and 7, and a few hundred metres of wadi bank to the east. Posts 5 and 3 were still in Italian hands and both companies were under considerable pressure from local Italian counterattacks, shelling and small arms fire. Neither would be advancing soon. The situation for Little’s D Company on the left flank however, was even more desperate.32
Captain Little, described as a ‘tall, well built man with a crisp, military cast of features, a clipped moustache, and a voice to go with them’, was ordered by Godfrey to take Post 11 on the left of the battalion assault.33 This was a crucial assignment. Located on a sharp bend on the south-western corner of the Italian perimeter, Post 11 covered both the western edge of Wadi el Muatered and the line of perimeter posts running north towards the main divisional break-in point. Little ordered 16 and 17 Platoons to cross the Wadi el Muatered to the right of Post 11 to attack it from the flank. The former was commanded by Lieutenant John Bowen, a ‘large, kindly, serious country boy’, and the latter by Sergeant Gullett.34 Meanwhile 18 Platoon, under Sergeant Romney Cole, ‘a giant of a man’, who had just bought a farm and become engaged, was to pressure Post 11 from the front as the flanking attack unfolded. After emerging from Wadi el Muatered, Bowen and Gullett’s advance was to be covered by machine-gun fire from a platoon of Vickers guns and a section of battalion mortars. In a key decision, Little detached all nine of his company’s Bren guns to the Vickers guns location. He thought to increase the weight of fire protecting his flanking platoons and, without the benefit of experience, judged the Brens unsuitable for close-quarters fighting in poor light.35
Before H-hour, Little’s men crept north along Little Wadi, keeping pace with Rowan’s C Company on their right. After pausing 350 metres short of Wadi el Muatered, at 5:45 am the company began its attack. In fading darkness the two flanking platoons moved out across the open ground to their right. The air was soon filled with shells, and tracer bullets fizzed over the heads of the attackers. Nonetheless, Bowen and Gullett advanced side by side and, although sure that the Italians could see them as they climbed down into the Wadi el Muatered and cut their way through the wire apron at its base, as yet no casualties had been taken. As the northern bank was being scaled, an Italian heavy machine-gun situated 30 metres back from the lip opened fire. This gun was silenced by a few well aimed grenades, and the advance continued. Once across the wadi the two platoons swung left and approached to within 90 metres of Post 11. At this point the Australian artillery barrage stopped and was replaced by an eerie and frightening silence. Still the defenders in Post 11 did not engage. The Australians inched forward and went to work cutting gaps in the wire surrounding the post. The two platoons inched through a gap cut in the wire, one after the other. The platoon commanders agreed that Bowen would go first. When Gullett was safely through the wire he would shout: ‘I am ready’. Bowen would then give the order to charge. The Australians formed an assault line and paused on one knee waiting the signal.36
When all were in position, only 35 metres from the post, Bowen bellowed ‘Up! D Company! Up! Up!’ Men sprang to their feet and raced forward. The Australian charge was short-lived. After covering half the distance to their objective the attackers were met by a wall of Italian small arms fire and a volley of grenades thrown from a trench/sangar complex surrounding the post. Unbeknown to D Company, the Italians had improved, fortified, and decided to fight from the concrete communications trenches running between the post’s main firing points. This gave the position a measure of all-round defence which foiled Little’s plan to flank it. It was now also apparent that the success of the two attacking platoons thus far had been no more than a consequence of strict Italian fire discipline. As one, the defenders released a hail of lead from point-blank range. In a few moments the Australians were on their stomachs and caught in open ground. With few places to go, the non-commissioned officers called their men forward and the crawling advance to the Italian position continued, with casualties mounting.37
Unlike some of their counterparts on the western face of the perimeter, the defenders within Post 11 had no intention of surrendering. The now disjointed, uncoordinated and desperate Australian assault had two basic axes. Gullett’s platoon pressed in on the post from the right and rear, while Bowen’s men inched forward further left. Bowen and some of his men managed to reach the outer Italian trenches and took cover behind a low stone wall. Here, Bowen tossed grenades into various Italian positions until he was fatally wounded. With his last breaths the young officer called his men further forward and crawled to within a few metres of Post 11. Back at the stone wall Sergeant P Millar, Bowen’s second- in-command, was shot by a treacherous Italian prisoner after hastily arranging an unsuccessful bayonet charge at some nearby sangars and a machine-gun post. One by one as they struggled forward towards Post 11, most of those left of Bowen’s platoon were killed by bullet and grenade. Only eight survived, by seeking shelter in a captured Italian sangar. Two hours later they were taken prisoner.38
To Bowen’s left, a section of Gullett’s platoon also managed to reach the first line of Italian trenches and sangars. There, in a scene reminiscent of the attack on Lone Pine in August 1915, the Australians set about pulling timber covers off trenches and shooting down into the defenders below. This small group, led by Corporal B A F Latham, cleared a number of trenches in this fashion but were soon isolated and taking fire from machine-guns positioned closer to the post. Forced to stay within the covered Italian trench, Latham’s men fought their way along its length until stumbling into a large bay filled with Italians. There the two parties killed each other. 39
Meanwhile, the remainder of Gullett’s platoon had closed up behind Latham’s thrust and moved into the outer Italian trench not far from the anti-tank ditch surrounding the post. There they paused to toss grenades. In response, the defenders brought down a curtain of fire. Eight men were killed in an instant and the rest pinned by the same Italian machine-gunners who had forced Latham underground. Gullett and a small party of six—Sergeant J B Scott, Corporal V N Maloney, Privates J Stewart and J Berley, and two brothers from Queensland, Claude and Bernie Damm—leapt out of their trench to take the gun. As the group scrambled forward, Stewart and Scott were shot dead. The Damms and Maloney pressed on and Gullett, although stunned by a nearby explosion, soon rejoined them. Surprised at the unlikely action, the Italian machine-gun crew surrendered. With no capacity for prisoners the Australians overturned the gun and sent the Italians away. The same small band then launched successful raids on two more nearby machine-gun nests. By now, however, it was clear to Gullett that Post 11 could not be taken. He struggled back to the outer trench and found, in addition to a number of other wounded Australians taking shelter there, only one additional uninjured man: Private H F Brockley, a driver from Battalion Headquarters, who had abandoned his post to join the attack. A veil of eerie silence descended. Perhaps stunned by the ferocity of the assault, or convinced no attackers could still be alive, for the first time the Italians seemed uncertain of what to do. With dawn breaking and no further sounds coming from Bowen’s flank, Gullett ordered all those who were able to leave him where he was and withdraw.40
Private Brockley refused Gullett’s command and instead began carrying him away from the Italian position. This began an epic withdrawal by Gullett, Brockley, the now wounded Maloney and the two Damm brothers. By this time Bernie was carrying his injured brother Claude on his back. The party crossed the first trench without problems, but from then on were forced to fight their way out. Gullett was further wounded in the right leg by shrapnel as grenades began to rain down. One exploded by Gullett’s right hand, lacerating his arm and face. By now the sun was rising and Italians began emerging from cover to rush the group. On each occasion they were repulsed by accurate rifle fire from the Damms, Brockley and Maloney. The Australians retreated further by leapfrogging backwards in groups of two, covering each other’s movement. After withdrawing in this fashion for around 250 metres, the group was ambushed by six Italians who rushed them from a section of unseen trench. The Damms shot and killed them to a man. Just as the Australian party approached the lip of Wadi el Muatered, however, the wounded Claude Damm (still on his brother’s shoulder), was hit again in the chest. He remarked to his brother, ‘Remember me to the parents, Bernie’, and died without saying goodbye.41
As the group disappeared below the lip of the Wadi el Muatered, Italian mortar bombs began to fall among them. An Italian soldier appeared in front of the dazed and wounded Gullett. Pressured by the moment, the Italian shot but missed.
With no weapon to respond, Gullett threw a damaged pistol and walked towards his attacker. The Italian fired and missed a second time, and as he was lining up a third attempt he was shot by Bernie Damm, moving along the edge of the Wadi el Muatered. Bernie held more Italians at bay while Gullett crossed the wadi. Unable to find a gap in the wire at the base of the wadi, Gullett forced his way under it. His leather jerkin protected him from Australian mortar fire, which had begun to suppress the northern bank. Still not safe, as Gullett clambered up the southern bank an Italian machine-gunner spotted and engaged him, shooting him through the left forearm. Eventually Gullett made it up the bank and took refuge behind a low stone wall. There he found Maloney, busily sniping at the offending Italian machinegunner. The pair was soon joined by Bernie Damm and Brockley, with bullets flying all around them. Of the original forty-eight attackers in 16 and 17 Platoons, only these four had made it back to the Australian lines.42 Major Rowan met up with Gullett at the stone wall and asked where D Company was positioned. Maloney replied: ‘We are here’.43 Gullett drew on a cigarette, amusing his small party as the inhaled smoke curled out of a hole in his cheek.44
Meanwhile, the situation back in Little Wadi was desperate. Little’s original plan to use Sergeant Cole’s platoon to pressure the frontal approach to Post 11, thereby distracting the defenders from the flanking attack, was a complete failure. This was no real surprise given that Cole advanced down the line of a tributary wadi against a post sited for the specific purpose of destroying any attack seeking to use this covered approach. Cole’s men walked into a pre-planned killing zone, exactly as those who designed Post 11 had hoped. The platoon was soon pinned by a considerable weight of machine-gun and anti-tank gun fire from Post 11, still 45 metres short of the wire in the base of Wadi el Muatered. Cole was forced to retire and seek shelter in abandoned Italian sangars located on the southern lip of the wadi, facing Post 11. With desperate energy his men built existing sangar walls higher and dug in for the remainder of the morning, taking casualties, and returning fire whenever possible.45
At this point, the appalling state of affairs for D Company went from bad to worse. In an amazing stroke of bad luck, at 8:00 am Little and Kiddle, conferring back in Little Wadi, fell victim to a stray Italian mortar bomb that landed squarely between them. Little was badly injured by shrapnel and Kiddle, mortally wounded, died en route to the battalion’s aid post. In tragic irony, Brigadier Savige had previously designated Kiddle as his liaison officer to 16 Brigade, but changed his mind and thus sealed Kiddle’s fate, when Godfrey pleaded to leave him in 2/6 Battalion.
What was left of D Company was now led by its senior survivor, Warrant Officer Jock Cowrie, the Company Sergeant Major. Cowrie inherited a dire situation. Two platoons were essentially destroyed, and the third was pinned and suffering badly on the southern bank of Wadi el Muatered opposite Post 11. Even the attached Vickers platoon had been all but wiped out, with only one gun still in action.46 Meanwhile, Italian machine-gunners firing on fixed lines poured thousands of rounds into the vicinity of the D Company position. According to Chester Wilmot, ‘the valley sang with the whine of ricocheting bullets’.47 With some idea that something had gone very wrong but without a clear picture of events, Godfrey sent forward a reserve platoon to support a further advance by Cole’s men. The best it could do was to help hold the positions in front of Post 11 and to keep digging. With D Company now bereft of officers, the survivors were told to hold on as best as they could until relieved.48
By lunchtime the situation across the front of 2/6 Battalion was stable if insecure. Both B and C Companies still held a small salient north of the wadi, including Posts 7 and 9, and around 250 metres of bank either side of them. What remained of D Company covered the left flank on forward slopes of Little Wadi. In the early afternoon the overall situation deteriorated further. At around 3:00 pm, Captain Rowan’s men in the vicinity of Post 9 came under another concerted counterattack. Although the Italian wave was repulsed, casualties mounted and ammunition ran low. Meanwhile, Captain Muhlhan’s company in and around Post 7 was attacked twice. The second time a party of Italian machine-gunners managed to infiltrate to the south side of the wadi and opened fire on the company from its rear right, driving the Australians in the area into Post 7 itself. Muhlhan’s men held on, but only just.49
Despite the precarious state of his battalion, in the late afternoon Godfrey conducted a reconnaissance for a night operation against Post 11, during which he was personally engaged by machine-gun fire. This, and the earlier fate of D Company it seemed, was still insufficient to encourage a reconsideration of his original plan. Post 11 must fall; Godfrey could countenance no other outcome. Only a message sent from Brigadier Savige not to attack any further, prevented another all-out assault on the post. As night descended, but for the odd exploding shell or burst of machine-gun fire, the tempo of the day died down. The Australians on the northern bank of Wadi el Muatered still sought shelter below its lip or in captured posts, with Italian bullets zipping overhead. Each Australian soldier across the line had an hour’s sentry duty before waking the man next to him. All stood to in the morning expecting further Italian counterattacks. 50
The next day Godfrey resumed his increasingly personal struggle with Post 11. In an example of overt stubbornness, pride and tactical ineptitude, he refused an obvious opportunity to flank the position during the afternoon, despite one of his platoons well to the east reporting that it had a clear route to do so. The platoon belonged to Lieutenant Sherlock who, in a desperate attempt to ensure he did not miss out on the action, had earlier all but abandoned his task of protecting an artillery observation group on the battalion’s right flank in favour of entering the Italian perimeter. Sherlock’s men had penetrated the perimeter between Posts 1 and 2 near the coast and were now on the northern bank of the mouth of Wadi el Muatered. The young officer sought instructions from Godfrey and then from Savige. In response, Savige suggested Godfrey might withdraw his battalion that night, leaving only enough men to ensure the Italians stayed in their posts, then to march east to Sherlock’s location and attack Post 11 from the rear. Godfrey rejected the suggestion out of hand. He told his acting second-in-command, Major G Smith, that he had no intention of giving away what he had thus far gained, and would never be seen to be withdrawing in the face of the enemy.51
Such sentiments were inexcusable, especially given the small amount of territory thus far captured by Godfrey. Smith was told to relay to brigade headquarters that such a plan was impractical as the forward companies could not be extricated. This was not true. If such a move was too dangerous in the daylight hours, it could have been done easily at night. Instead, Godfrey spent the afternoon planning more frontal assaults on Post 11 despite the fact that each mortar, machine-gun, or anti-tank artillery attack drew nothing but an increased volume of fire from an undiminished post.52 Despite the lack of impact of such bombardments, the fact surprise was long lost, and in the face of the demonstrated resilience of the post, in the late afternoon Godfrey discussed the possibility of a night-time grenade attack. Only a lack of supporting artillery convinced him to wait until morning. Godfrey’s proposed dawn assault was cancelled, not on account of a long overdue acknowledgment of the tactical reality of the situation, but in reluctant deference to an order to temporarily cease all further attacks. This order was passed in preparation for a 19 Brigade advance south from Bardia village (which had fallen that afternoon) into the southern sector of the Italian defensive system scheduled for the following morning. 53
True to form, once the ban on further offensive action was lifted, Godfrey ensured his men spent the morning hours of 5 January attacking. After all, if two days of failed attempts had not convinced him that Post 11 could stand against assault from the south, then a third dawn was not likely to bring a change of heart. This time Captain Rowan’s company was to patrol from its position on the lip of Wadi el Muatered, west to the sangars surrounding the Post 11. Once in position Rowan was ordered to rush it under covering fire from the remnants of D Company, still dug in across the wadi from the stalwart post. By 9:00 am Rowan’s men were closing stealthily on Post 11. To attract attention away from their silent advance, Godfrey ordered his carrier platoon to attack Post 13, 800 metres to the north-west. Twenty minutes later, as the carriers jockeyed into position, Godfrey was astonished to learn that a platoon from 19 Brigade, having led an advance from the north into the rear of the defenders along Wadi el Muatered, had just taken Post 8, only 500 metres to the north of Post 11.
Fearing his prize might soon fall to someone else, Godfrey rushed his (Bren) Carrier Platoon forward against Post 13. Meanwhile, on the north bank of the Wadi el Muatered, Rowan’s men crept undetected to within 150 metres of their objective. At that moment Post 11’s defiant commander hoisted the Italian Flag. Meanwhile, the 2/6 Battalion carrier attack on Post 13 had begun. The carriers, spaced 25 metres apart, nosed over the lip of Wadi el Muatered, firing every weapon available at the post. Then, under heavy return fire, they charged. About half way to their objective, white flags began to appear and the Italian fire slackened, but did not stop. Six carriers made it to the surrounding ditch and pinned the defenders with machine-gun fire, while a party of three Australians ran forward, cut the surrounding wire and began tossing grenades into the post. Under such an onslaught the defenders surrendered and the carriers immediately reoriented their fire onto Post 11. The last Italian bastion was now surrounded. The 19 Brigade platoon had just taken another post to the north, Godfrey’s carrier platoon was pouring fire into it from the west, and Captain Rowan’s company was closing from the south-east.54
At 12:05 pm, 15 minutes after Post 13 fell, Rowan launched his attack on Post 11 with a volley of grenades. At the same time, what was left of D Company opened fire, and British Infantry Tanks attached to the 19 Brigade platoon to the north suddenly appeared to the rear of the post. This new combination of threats, especially the appearance of tanks, was finally enough to convince the tenacious Post 11 that its position was at last untenable. The Italian commander, recently wounded, lowered the tricolour and hoisted a white flag.55 As Rowan and his men moved forward to take the surrender they were astounded to find that no less than 24 Italian officers and around 320 men had emerged. Inside Post 11 the Australians collected two field guns, six anti-tank guns, a number of mortars, 325 rifles, and 12 medium and 27 light machine-guns. Evidence of the resolve of the defenders was clear. One of Rowan’s men, Private F J Gorman, bore witness to ‘dead dagos in numbers minus hands and legs. Others terribly badly mutilated ... lying around on the ground amongst the dead enemy are holy pictures scattered in profusion as well as prayer books. It [was] not much of a pleasant sight.’56 Two wounded members of Captain Little’s original assault of 3 January were also found in the position. Both had been well treated. Godfrey personally sought out the Italian commander, who wore a British Military Cross from the First World War, to acknowledge the most resolute defence of any Italian position anywhere on the perimeter at any time in the battle. An overly romantic Brigadier Savige later thought it ‘a worthy ending when two very gallant leaders stood on that rocky point and shook hands before their own troops’.57 More to the point, as British headquarters noted, it was fortunate for 6 Division that the remainder of the Bardia garrison was not of this calibre.58
A few days after the battle, Private H Dunkley wrote home claiming that his battalion ‘got the thick end of the stick in attacking a hell of a cliff topped by concrete fortresses ... hell let loose and some of my best friends in the show killed’.59 He was right about the difficulty of the fighting but wrong regarding the ‘thick end of the stick’—that had been handed to him quite deliberately by Lieutenant Colonel Godfrey and Brigadier Savige. Subsequent authors have often represented the 2/6 Battalion attack at Wadi el Muatered, and particularly at Post 11, as a tragedy of necessary self-sacrifice. It was more accurately a tragedy of poor leadership and wasted life. Sixty-four Australians lay dead and wounded for 500 metres of tactically insignificant wadi bank. The first day of the attack was the single most costly 24 hours for 2/6 Battalion of the entire war.60 Godfrey’s men may well have helped ensure, as Gavin Long would have it, that ‘no help could be sent from the southern sector against the battalions which had been allotted the job of making the breakthrough on the western side’.61 However, they could just have easily done this by demonstration rather than by futile assault. Less than three weeks later and in the first battle for Tobruk, two battalions from 17 Brigade managed to successfully demonstrate by fire against the Italian right flank to draw attention from main point of entry—without launching a full-scale attack. Many of Godfrey’s men need not have given their lives in such a futile enterprise.
Garth Pratten’s recent study of Australian unit command in the Second World War quite rightly described Godfrey’s actions around Wadi el Muatered as ‘pure folly’, ‘muddle-headed’ and a ‘dangerous example of a CO trying to make his mark’.62 His overblown soldierly pride mixed with Savige’s tacit acquiescence was a recipe for disaster. Nor does the criticism of Godfrey deserve to end here. Leaving aside the overall decision to attack, his clear lack of tactical acumen is damning. For example, most of D Company was destroyed while testing a flank over open ground in daylight. Godfrey should have known better. So too, much of his lack of control during the day was a consequence of situating his headquarters too far forward, where it was subjected to too much effective indirect fire to function properly. Godfrey only ever expected and planned for success. Failure to take their initial objectives therefore left his battalion stranded astride a wadi swept with fire. It had no depth and not enough artillery support available to remedy the situation.63 Men suffered as a result. Gullett, as much a victim of Godfrey’s incompetence as anyone who lived through the day, later reflected: ‘Tactically it was not a very well planned or carried out operation but I am sure that Brigadier Savige and Colonel Godfrey were right when they decided that in our first assault we should teach a lesson they would not forget, regardless of the cost to the individual companies concerned’.64 Gullett’s assessment is far too forgiving. They were wrong and the lives spent bought little.
True to the Anzac tradition, the ill-fated attack on Post 11 was quickly transformed from a low point of command and tactical failure to representing a high point of Australian fighting spirit. De-emphasising the unsavoury aspects of his own involvement, less than a week after the attack Savige began the celebratory tradition. He wrote: ‘Post No. 11 may be handed down in history connected with this battle. It was a second Mouquet Farm ... the troops endured shelling almost as intense as the Somme without flinching’.65 Godfrey went further claiming the position ‘could defy capture if manned by Australian troops’.66 The more brazen the courage, tragic glory and loss, it seems, the less important the reasons for the setbacks encountered. An official 17 Brigade report colourfully described how ‘The 6th [2/6 Battalion] added undying lustre to the already illustrious record of that regiment by its action ... which was of the greatest importance to the general operation’.67 As its first engagement the ‘lustrous’ reputation of the 2/6 Battalion was yet to be forged, and the attack was at best marginally significant to the ‘general operation’. Accuracy, however, was not necessarily the point. It would simply not have done to call Post 11 what it was—a needless, poorly envisaged and badly executed assault that achieved nothing of substance—sentiments that effectively sum up 2/6 Battalion’s operations in the vicinity of Wadi el Muatered during the Battle of Bardia, despite the personal bravery of its members.
Endnotes
1 W R Griffiths, ‘17 Brigade at Bardia’, Australian War Memorial (AWM), Series 67, Item 3/220F; S Savige, ‘Comments of Draft Chapter VIII of Official History “The Battle of Bardia”’, September 1948, AWM 67, 3/348.
2 H Gullett, Not as a Duty Only: An Infantryman’s War, Melbourne University Press, Carlton, p. 13; Griffiths, ‘17 Brigade at Bardia’; P Charlton, The Thirty-Niners, MacMillan, Melbourne, 1981, p. xi; G Long, To Benghazi, Australian War Memorial, Canberra, 1952, p. 184.
3 Extract of a private diary (unidentified) in ‘Summary of the Battle of Bardia’ compiled by AIF Historical Records Section, 3 April 1941, AWM 54, 521/1/15; Chester Wilmot, ‘Talk with Brigadier General Savige’, Transcript of ABC broadcast, AWM 27, 113/1; 17 Australian Infantry Brigade Intelligence Summary No. 5, 1 January 1941, 2/2 Field Regiment War Diary, AWM 52, 4/2/2; Long Papers, AWM PR88/72, [6]; S Savige, ‘Battle of Bardia: Report of Action by 17 Australian Infantry Brigade’, AWM 52, 8/2/17.
4 17 Australian Infantry Brigade Intelligence Summary No. 6, 3 January 1941, AWM 52, 8/2/17.
5 17 Infantry Brigade Operation Order No. 2, 1 January 1941, 6 Australian Division ‘GS’ Branch War Diary, AWM 52, 1/5/12.
6 Ibid.; S Savige, ‘Comments of Draft Chapter VII of Official History “Before Bardia”’, 15 June 1950, AWM 67, 3/348.
7 2/6 Australian Infantry Battalion Operation Order No. 1, 2 January 1941. AWM 54, 521/1/13.
8 Gullett, Not as a Duty Only, p. 14.
9 Letter, Wrigley to Long, 5 March 1947, AWM 67, 3/438.
10 Attachment to Letter, Brock to Mackay, 11 January 1941, AWM 3DRL6850, [100].
11 Savige, S., ‘Battle of Bardia: Report of Action by 17 Australian Infantry Brigade’; A Godfrey, ‘Report on Activities of 2/6 Australian Infantry Battalion in the Battle of Bardia’, AWM 54, 523/7/30.
12 Charlton, The Thirty-Niners, p. xviii.
13 Savige, ‘Comments of Draft Chapter VII of Official History “Before Bardia”’.
14 Ibid.
15 Charlton, The Thirty-Niners, p. x.
16 Ibid.
17 G Keating, The Right Man for the Right Job: Lieutenant General Sir Stanley Savige as a Military Commander, Oxford University Press, Melbourne, 2006, p. 45.
18 B Pitt, The Crucible of War: Western Desert 1941, Jonathan Cape, London, 1980, p. 139.
19 Letter, Savige to Berryman, 1 January 1941, 6 Australian Division ‘GS’ Branch War Diary, AWM 52, 1/5/12.
20 ‘Notes of Final Conference held at Headquarters 6 Australian Division at 1430hrs, 2 January 1941’, 6 Australian Division ‘GS’ Branch War Diary, AWM 52, 1/5/12.
21 Gullett, Not as a Duty Only, p. 14.
22 Savige, ‘Comments of Draft Chapter VII of Official History “Before Bardia”’; Gullett, Not as a Duty Only, p. 14
23 Attachment to Letter, Brock to Mackay, 11 January 1941, AWM 3DRL6850, [100].
24 S Savige, ‘Summary of Battle of Bardia, AWM 3DRL2529, [21].
25 Ibid.
26 Charlton, The Thirty-Niners, p. xviii.
27 Savige, ‘Comments of Draft Chapter VII of Official History “Before Bardia”’.
28 Extract of 2/6 Battalion War Diary in ‘Summary of the Battle of Bardia’ compiled by AIF Historical Records Section, 3 April 1941, AWM 54, 521/1/15; 2/6 Battalion War Diary, AWM 52, 8/3/6; 2/6 Australian Infantry Battalion Operation Order No. 1, 2 January 1941, AWM 54, 521/1/13; Griffiths, ‘17 Brigade at Bardia’.
29 Note written by Brigadier S Savige, 6 January 1941, AWM 54, 521/2/8; Griffiths, ‘17 Brigade at Bardia’; 2/6 Battalion War Diary, AWM 52, 8/3/6; Savige, ‘Battle of Bardia: Report of Action by 17 Australian Infantry Brigade’; Gullett, Not as a Duty Only, pp. 16–17.
30 Godfrey, ‘Report on Activities of 2/6 Australian Infantry Battalion in the Battle of Bardia’; Griffiths, ‘17 Brigade at Bardia’; Savige, ‘Battle of Bardia: Report of Action by 17 Australian Infantry Brigade’; D Hay, Nothing Over Us: The Story of the 2/6th Australian Infantry Battalion, Australian War Memorial, Canberra, 1984, pp. 95-96.
31 Long, To Benghazi, p. 187.
32 Long Papers, AWM PR88/72, [6].
33 Gullett, Not as a Duty Only, pp. 2–5.
34 Gullett’s background was unlike most other 6 Division NCOs. Born Henry Baynton Somer Gullett, he was a junior reporter with The Melbourne Herald before the war. Gullett went to school at Geelong Grammar and later studied at Oriel College, Oxford. He had also studied for a year at the Sorbonne in France. He had also been a cadet at Geelong, and a member of the Officer Training Squadron at Oxford. Charlton, The Thirty-Niners, p. 24; Gullett, Not as a Duty Only, pp. 2–5.
35 Gullett, Not as a Duty Only, pp. 2–5.
36 Ibid., pp. 15–18.
37 Long, To Benghazi, p. 185.
38 Long Papers, AWM PR88/72, [6]; Godfrey, ‘Report on Activities of 2/6 Australian Infantry Battalion in the Battle of Bardia’; Griffiths, ‘17 Brigade at Bardia’; Long, To Benghazi, p. 185.
39 Gullett, Not as a Duty Only, p. 19; Long, To Benghazi, pp 185-86; W B Russell, There Goes a Man: the Biography of Sir Stanley G. Savige, Longmans, London, 1959, p. 203.
40 Gullett, Not as a Duty Only, pp. 19–21.
41 Long Papers, AWM PR88/72, [6]; Gullett, Not as a Duty Only, pp. 23–25.
42 2/6 Battalion War Diary, AWM 52, 8/3/6; Long, To Benghazi, p. 186.
43 Gullett, Not as a Duty Only, pp. 25–26.
44 Ibid., pp. 25–26.
45 H Stewart, ‘Report of D Company Attack on Post 11, 3 January 1941’, AWM 52, 8/3/6; Long Papers, AWM PR88/72, [6]; Long, To Benghazi, p 187; Hay, Nothing Over Us, p. 94.
46 Godfrey, ‘Report on Activities of 2/6 Australian Infantry Battalion in the Battle of Bardia’; Savige, ‘Comments of Draft Chapter VIII of Official History “The Battle of Bardia”’; Wilmot, ‘The Fight for Post 11’; Long, To Benghazi, p. 187.
47 Wilmot, ‘The Fight for Post 11’.
48 2/6 Battalion War Diary, AWM 52, 8/3/6; Hay, Nothing Over Us, p. 90; Charlton, The Thirty-Niners, pp. 108–09.
49 ‘Report of B Company (2/6 Battalion): Participation in the Battle of Bardia’, AWM 52, 8/3/6; Savige, ‘Battle of Bardia: Report of Action 17 Australian Infantry Brigade’; Griffiths, ‘17 Brigade at Bardia’; 6 Australian Division ‘GS’ Branch War Diary, AWM 52, 1/5/12; Long, To Benghazi, p. 188.
50 Savige, ‘Comments of Draft Chapter VII of Official History “Before Bardia”’; Savige, ‘Battle of Bardia: Report of Action 17 Australian Infantry Brigade’; 2/6 Battalion War Diary, AWM 52, 8/3/6; Hay, Nothing Over Us, p. 96.
51 G Pratten, ‘The “Old Man”: Australian Battalion Commanders in the Second World War’, PhD Thesis, Deakin University, 2005, p. 151.
52 Extract of 2/6 Battalion War Diary in ‘Summary of the Battle of Bardia’ compiled by AIF Historical Records Section, 3 April 1941, AWM 54, 521/1/15; Savige, S., ‘“Battle of Bardia”, Report of Action by 17 Australian Infantry Brigade, AWM 52, 8/2/17; 2/6 Battalion War Diary, AWM 52, 8/3/6; Hay, Nothing Over Us, p. 98.
53 Godfrey, ‘Report on the Activities of 2/6 Australian Infantry Battalion in the Battle of Bardia’; Pratten, ‘The “Old Man”’, p. 151.
54 S Trigellis-Smith, All the King’s Enemies: A History of the 2/5th Australian Infantry Battalion, Australian Army Training Command, Georges Heights, 1984, p. 64.
55 Godfrey, ‘Report on the Activities of 2/6 Australian Infantry Battalion in the Battle of Bardia’; 2/6 Battalion War Diary, AWM 52, 8/3/6.
56 F J Gorman, ‘Diary entry for 7 January 1941’, AWM PR85/250.
57 Savige, ‘Summary of Battle of Bardia’, AWM 3DRL2529, [21]
58 Long Papers, AWM PR88/72, [6]; Extract of 2/6 Battalion War Diary in ‘Summary of the Battle of Bardia’ compiled by AIF Historical Records Section, 3 April 1941, AWM 54, 521/1/15; ‘Bardia: Account of Operations of 13 Corps, December 1940-January 1941’ The National Archives (UK), Series CAB106, Item 383; Long, To Benghazi, pp. 197–98.
59 Letter, H Dunkley to L Dunkley, 8 January 1941, AWM PR84/035.
60 Long, To Benghazi, p. 188; Hay, Nothing Over Us, p. 91.
61 G Long, ‘NSW Battalions Chosen for Assault’, The Sydney Morning Herald, 6 January 1941.
62 Pratten, ‘The “Old Man”’, p. 149.
63 Ibid., p. 150.
64 Letter, Gullett to Chapman, 10 May 1968, AWM 3DRL6433, [1].
65 S Savige, ‘Report of the Battle of Bardia, 8 January 1941’, AWM 52, 8/2/17.
66 Godfrey, ‘Report on Activities of 2/6 Australian Infantry Battalion in the Battle of Bardia’.
67 Savige, ‘Report of the Battle of Bardia, 8 January 1941’.